Welcome back to another article in our series on winning Camel Up! If you’ve missed part 1, part 2, or our code review, you can find them here: How to Beat Your Dad at Camel Up / How to Beat Your Dad At Camel Up (Part 2) / How To Beat Your Dad At Camel Up (Interlude – Code Review)
Today we’re going to turn up the speed to 11! So far, our simulations have been completely CPU-bound. This means that while the code is simpler, simulations run slower. Simulating 100,000 games of camel up took approximately 10 minutes. This is partially because of the use of Python, and partially because of a lack of parallelism.
This has been fine for my purposes so far. However, I want a strategy with a savvy better who knows the odds of each camel winning the leg. They can then make an informed decision of the expected value of each betting tile. My expectation is that this would blow the “TakeLeader” betting strategy out of the water!
There’s a problem. It’s tricky to find the probabilities of each camel winning the leg given the game state. The only way I can see to do this is using Monte Carlo simulations. So, we want to run many simulations as quickly as possible!
What if I told you we can do better than our Python performance? What if I told you we can do BILLIONS of simulations in seconds? Well, we can using CUDA!
What is CUDA?
Simplistically, CUDA is the language of NVIDIA graphics cards. It underpins many popular machine learning libraries including PyTorch and TensorFlow. It’s very close to C/C++ in terms of syntax but requires a different approach to writing programs. It requires an understanding of memory and when to move data between the CPU & GPU. You can read more about CUDA here.
CUDA is really useful because graphics cards are great at parallel computation. For our purposes, this means that we can run simulated legs in parallel in separate threads. A 4060 has 24 streaming multiprocessors (SMs) which can each have over 1000 threads for over 24,000 threads running simultaneously! I thought this would be a really good approach for me to run my simulations. So, I set out to learn how.
Learning CUDA
Learning the basics of CUDA was a daunting affair. I’ll briefly sketch the path I took to writing my first programs. For reference, I am a fairly experienced Python developer that has not written much C++ before. So, I need to:
- Familiarize myself with C++,
- Understand how to write parallel programs,
- Make CUDA work on my machine,
- Write the thing!
Familiarizing myself with C++
I hadn’t written much C++ before, so, brushing up my C++ was the first hurdle. I started by implementing basic data structures / algorithms using The Algorithm Design Manual. Writing implementations of linked lists and binary search trees introduced me to the syntax of C++. Once I felt more confident, I started solving Leetcode problems daily to practice the basics. After a couple of weeks I felt capable of starting to do more. I also started reading A Tour of C++ by Bjarne Stroustrup which was very useful in picking up C++ idioms.
Understanding how to write parallel programs
Parallel programs require a different thought process to other programs. Sasha Rush’s GPU-puzzles were super useful in learning how to think about CUDA programs. They’re based in Python and can be run on Google Colab. They step you through writing parallel programs from simple vector addition up to matrix multiplication. They also have cute pictures of puppies when you solve a problem.
Lecture material from the Oxford CUDA programming course were very useful in understanding more about CUDA directly.
Making CUDA run on my machine / graphics card
I needed to ensure my local development environment was correctly set up to use CUDA. Docker was extremely helpful here, in conjunction with the nvidia-container-toolkit. NVIDIA has a suite of CUDA-ready images which, while requiring some Docker knowledge, make the process seamless. I firmly believe that Docker is one of the most important tools for a software engineer to know. So, if you’re not familiar with it, now’s the time to start!
Writing the Simulations
Now that we’re all set up, it’s time to write some CUDA! If you want to follow-along at home, the full code for this simulation can be found here.
Aim
The simulation aims to find the probability of each camel winning the leg given a game state. The important input variables are:
- The positions of the camels on the track,
- Which dice remain to be rolled,
- Which camels are stacked in which order.
The simulation would then select a die to roll and move the appropriate camels until each die had been rolled. Then, it would record which camel won the leg, first by track position and tie-breaking by top of stack.
Main Method
This loop appears to be fairly common in CUDA applications:
- Allocate memory on both CPU & GPU,
- Copy data from CPU -> GPU,
- Run simulations on GPU,
- Copy data back from GPU -> CPU,
- Summarize results.
We need to start by making our input variables. We also allocate some space for the results on the CPU:
  std::cout << "Creating host variables..." << std::endl;
  int positions[NUM_CAMELS] = {0, 0, 0, 0, 0};
  bool remainingDice[NUM_CAMELS] = {1, 1, 1, 1, 1};
  int stack[NUM_CAMELS] = {1, 2, 3, 4, -1};
  T *results;
  results = (T *)malloc(NUM_CAMELS * sizeof(T));
I’ve made T a template variable depending on how many simulations you want to do. For a small number an int type will be fine. Once you start getting into the billionaire club, you’ll want something a little bigger! I’ve gone for an unsigned long long int to handle those huge numbers.
We also need to allocate memory for the results and the random seeds on the GPU. I used curand for random number generation on the GPU and it was relatively easy. The setup_kernel provides a different seed for each thread so that we do get different simulations.
std::cout << "Creating device pointers..." << std::endl;
  T *d_results;

  curandState *d_state;
  cudaMalloc((void **)&d_state, BLOCKS * THREADS * sizeof(curandState));

  std::cout << "Setting up curand states..." << std::endl;
  setup_kernel<<<BLOCKS, THREADS>>>(d_state);

  std::cout << "Allocating memory on device..." << std::endl;
  cudaMalloc((void **)&d_results, NUM_CAMELS * sizeof(T));

  cudaMemset(d_results, 0, NUM_CAMELS * sizeof(T));
I’ve chosen to copy across the input parameters into constant memory on the device. I initially had them as global memory passed into the kernel directly. This required every thread to access global memory many times. Using constant memory allowed cached read-only access by each thread to increase performance over using global memory. To do this, I declare constant variables at the top of the file and then copy using cudaMemcpyToSymbol instead of cudaMemcpy:
// Defines as constant memory in GPU kernel
__constant__ int d_positions[NUM_CAMELS];
__constant__ bool d_remaining_dice[NUM_CAMELS];
__constant__ int d_stack[NUM_CAMELS];
__constant__ int local_runs;

...

  std::cout << "Copying to device..." << std::endl;
  cudaMemcpyToSymbol(d_positions, positions, NUM_CAMELS * sizeof(int));
  cudaMemcpyToSymbol(d_remaining_dice, remainingDice, NUM_CAMELS * sizeof(bool));
  cudaMemcpyToSymbol(d_stack, stack, NUM_CAMELS * sizeof(int));
We’re now in a good place to actually run the simulation! the camel_up_sim kernel will run the simulations and store the results in the d_results array. We then need to copy that back across to the CPU, again using cudaMemcpy.
std::cout << "Starting sim..." << std::endl;
  camel_up_sim<T><<<BLOCKS, THREADS>>>(d_state, d_results, RUNS_PER_THREAD);

  cudaDeviceSynchronize();

  std::cout << "Copying results back..." << std::endl;
  cudaMemcpy(results, d_results, NUM_CAMELS * sizeof(T),
             cudaMemcpyDeviceToHost);

  std::cout << "Results are:" << std::endl;
  printArray(results, NUM_CAMELS);
We then clean up after ourselves! No one likes a litterer…
  cudaFree(d_positions);
  cudaFree(d_results);
  cudaFree(d_remaining_dice);
  cudaFree(d_state);
  cudaFree(d_stack);

  free(results);
cudaFree specifically frees memory on the GPU, while free frees memory on the CPU.
Simulation Kernel
Let’s now take a look at the kernel we’re using to simulate the leg. I’m not going to go through this line-by-line, but there’s a few bits I want to point out.
Aggregation of results
The final aggregation and reporting of results across threads is an important optimization of the code. The results variable is an array of length five, one slot for each camel. We need to get the results from all the threads to report back in an orderly way. My idea here is to:
- Use some warp-level ideas to get the results from each warp in one thread.
- The first thread in the warp then writes the sum to shared memory atomically.
- The first thread of each block then writes back to the final result array atomically.
I used __shfl_down_sync to sum the results for each thread in a warp. This will end with the first thread in the warp having the sum for all threads in the warp. That thread then reports to shared memory to aggregate across all the warps in the block.
for (int i = 0; i < NUM_CAMELS; i++) {
    #pragma unroll
    for (int offset = 16; offset > 0; offset /= 2) {
      thread_results[i] +=
          __shfl_down_sync(FULL_MASK, thread_results[i], offset);
    }

    // If it's the first thread in a warp - report the result to shared memory.
    if (thread_idx % 32 == 0) {
      atomicAdd(&shared_results[i], thread_results[i]);  // explained below
    }
  }
The first thread in the block then takes the shared results and adds them to the final results array:
if (thread_idx == 0) {
    #pragma unroll
    for (int i = 0; i < NUM_CAMELS; i++) {
    atomicAdd(&results[i], shared_results[i]); // explained below
    }
  }
The atomicAdd function has been used twice above. This reads the current value and writes back the sum in a transaction. This means we avoid race conditions between the different threads which would invalidate the results.
Local memory is actually global?
This is an area that I’m still learning about. Using local variables in the kernel can either be stored in registers, or global memory. If it gets stored in global memory then there is a significant performance overhead. Usually scalar variables are stored in registers, but arrays might not be. Arrays need to be both a size that the compiler can figure out at compilation, and also not referenced by a dynamic runtime constant.
  int local_positions[NUM_CAMELS]; // Global?
  bool local_dice[NUM_CAMELS]; // Global?
  int local_stack[NUM_CAMELS]; // Global?
  int dice_remaining; // registers
  int eligible_camels[NUM_CAMELS]; // Global
  int camel_to_move; // registers
  int roll; // registers
  int camel_on_top; //registers
  int winner; //registers
What does this mean? I’m not 100% sure yet. I will need to consider alternate approaches to ensure our arrays are in registers or shared memory. This will be a topic of further research for me. Do you have any tips? Let me know!
Results & Optimizations
I started by seeing how many simulations would complete in a short time. I used 100k simulations per thread, 1024 threads in a block, and 24 blocks in total. This led to 100000 * 1024 * 24 ~= 2.5b simulations which ran in approximately 4 seconds!
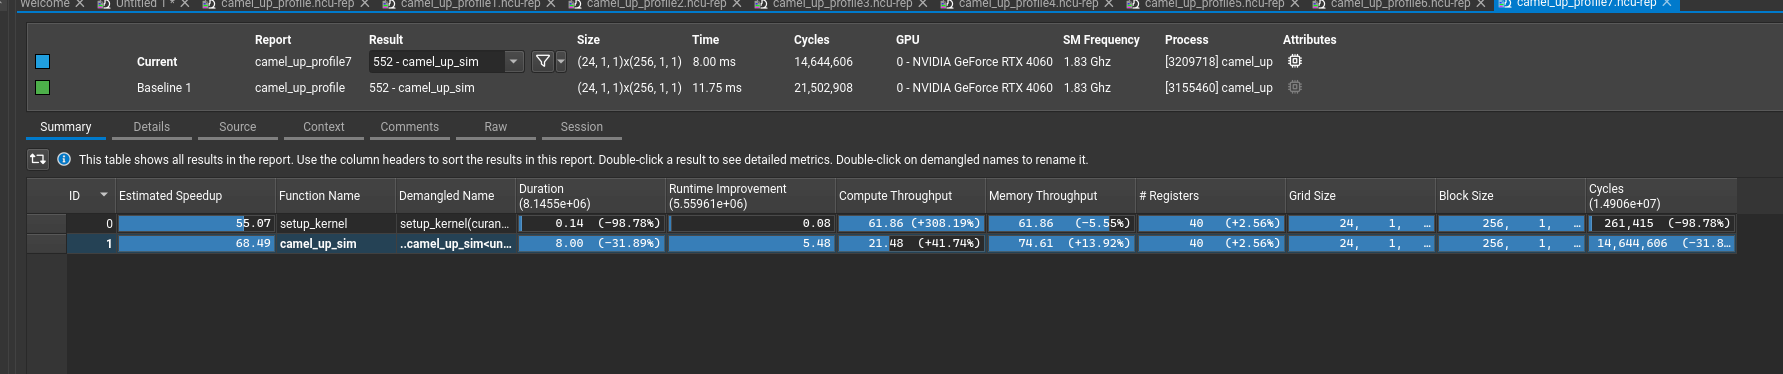
I then started profiling the code using the Nsight suite from Nvidia. I reduced the thread count as running the 2.5b simulations crashed Nsight! My code is still not optimal, but a few optimizations yielded a 31% speed-up.
- Adding the #pragma unroll – this tells the compiler that a for loop can be written out instead of looping. As NUM_CAMELS = 5 is fairly small, this seemed to help the threads execute better.
- My initial code for choosing a die to roll repeatedly sampled until it found a die that had not been rolled yet. This was stalling the other threads who had already found their die. Replacing that code with the eligible_camels array to guarantee selecting a die that was valid provided a large performance boost
#pragma unroll
      for(int i = 0; i<NUM_CAMELS; i++) {
        if(local_dice[i]) {
            eligible_camels[j] = i;
            j++;
        }
      }

      camel_to_move = eligible_camels[curand(&local_state) % dice_remaining];
What’s Next?
It’s clear that I need to improve my usage of the Nsight suite. I’ll be upskilling in this area using any courses & videos I can find, along with my own experimentation.
The next article will be about my experience creating a reinforcement learning player for Camel Up using gymnasium! Stay tuned!
Leave a Reply to How To Beat Your Dad At Camel Up (Part 4 – Reinforcement Learning) – Mr. GrumpyKitten Cancel reply